
Type your question
BaseData
File

| Name | BTI reads and presents the name of the LNM file. You cannot change the name here you need to change the name of the LNM file. You cannot change this field if you need to change this do so in the folder where the file is. Be sure after changing the name that you let BTI re-read the file, before you make any change to the bush trip. If you do not your changes are lost. |
| Little Navmap | In this field is the full path and name of the LNM file. You cannot change this field, if you need to change this do so in the folder where the file is. Be sure after changing the name that you let BTI re-read the file before you make any change to the bush trip. If you do not your changes are lost This field is only visible, if a mission with an attached LittleNavmap-File is loaded, i.e. BushTrip or LandingChallenge. |
Project

| Project | The name of the project. This must be unique in the community folder and should be in the format XXX-YYY-zzz. |
| Short Name | To avoid very long pathnames, you can define here a shorter name. This filed is used as the last directory name and some filenames in your project. |
| Project Group | You can group your mission for a better organization on your harddisk. This changes the output path from %ProjectRoot% to the defined folder in the project group, when anything is selected. Clicking the X will revert the contents of the project group to the default file system. Project groups will be defined on Options-Sheet. |
| Author | Your Gamertag. BTI reads your Gamertag from the information in your license. This field cannot be changed. |
| Title | The Title of your bush trip. BushTripInjector generates this automatically from the cities of the departure and destination airport. If the city names cannot be determined, the name of the airport (ICOA) is used. This is used as the main headline in the bush trip menu and inside the Content Manager of the Flight Simulator. This field is user adjustable. |
| Project type | Default is BushTrip. Will be asked on first import. Possible values are BushTrip, Discovery, LandingChallenge, Bundle and Tutorial. |
| Project language | Default is English(United States) This is the language, your bush trip is built on and you used in Little Navmap to describe the trip and flight plan. It is important for translation to set this correct. |
| Version | The Version number of your project. You can change the version number manually, or use the Publish feature to have BushTripInjector change the version. |
| Append Build | If this box is checked, each generation of a mission will result in a new mission unique to the simulator. This allows you to start your journey from scratch at any time, even with SU10. |
| Release Notes | This will open a new dialog, where you can define release notes for former, current and future versions. Release notes are shown in the Content Manager of MSFS. |
Mission

| Location | The location of your bush trip . This is automatically generated from the airport names. This information is displayed during the loading of the bush trip when the pilots start a leg. This field is user adjustable. |
| Description | A short description BushTripInjector determines this from the project name or file name of the flight plan. This is used as the second headline in the bush trip menu of the Flight Simulator. This field is user adjustable. |
| Loading Tip | This text is displayed while the bush trip is loading. The loading tip text is automatically generated from the ICAO codes of the route’s airports. This field is user adjustable, and you can define up to 10 rotating loading tips. |
| Exclude def. | When ticked, BushTripInjector will remove the default loading tips from our trip. |
| Introduction | Here the text from the „Flight Plan Remarks“ field form Little Navmap is displayed. If not already filled, BushTripInjector will try to generate it, but it will be a short text. The introduction text is displayed on the main page of your bush trip in the flight simulator. The field is read-only and is maintained in Little Navmap.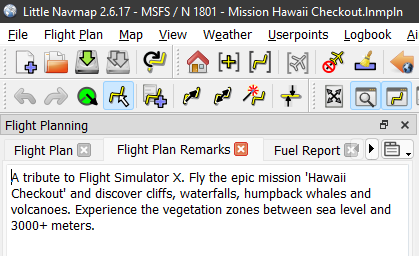 |
| Unlock | By default, BushTripInjector takes the „Introduction“ from Little Navmap’s „Flight Plan Remarks“. If you tick the box, you can define this inside of BushTripInjector and the „Flight Plan Remarks“ from Little Navmap are ignored. |
| Add TTS | When you use this button, the Introduction text is written into the Text-to-Speech section. |
Discovery Flight
The Discovery Flight group is only available for the mission type „Discovery“

| Discovery Type | Select the typ of your Discovery Flight. Available options are Core, WU (World Update) and GOTY (Game of the year). |
| StartingCamera | Defines the camera when starting die Discovery Flight. Available options are Aircraft and Cockpit. |
| Center Lat | The latitude of your Discovery Flight center position |
| Center Lont | The longitude of your Discovery Flight center position |
| Center Dist. | The Radius of your Discovery Flight around the center position |
| Center Height | The Height of your Discovery Flight |
| Aircraft Position | The Latitude, Longitude and Altitude where your Aircraft will spawn into the Discovery Flight |
| Speed | The airspeed your aircraft will spawn |
| Heading / Pitch / Bank | The Heading, Pitch and Bank of your aircraft |
| Audio MusicStyle | Enter the style of music in your discovery mission. Select from predefined music by Microsoft or choose a own Wwise-Soundbank file. More information about the Wwise-Soundbank and MusicSelection can be found here (PlayMusicAction). |
Bundle
The Bundle group is only available for the mission type „Bundle“.
Learn more about bundles here: Bundle.
Aircraft
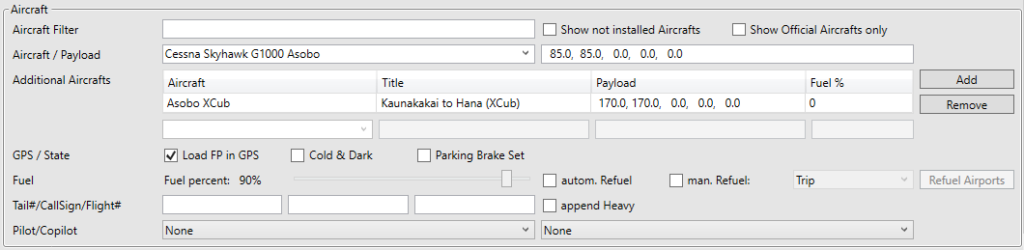
| Aircraft Filter | Enter some text here for an full text filter in the aircraft list. | |
| Show not installed Aircraft | If ticked, you are able to select also aircrafts, which are not installed on your rig but known by BushTripInjector. | |
| Show Official Aircraft only | If ticked, BTI shows in the aircraft selection box only official aircrafts of the sim. Helpful for Marketplace Content Creators to reach all users. | |
| Aircraft Selection | All Aircrafts of MSFS and your Community-Folder are selectable. Be aware of the Deluxe and Premium Deluxe Aircrafts and Aircrafts/Liveries from Community-Folder. Users without those content will not see the bush trip. | |
| Payload | Define the initial payload. This field is aircraft specific and follow the order in the payload menu. I.e., for a Cessna 172 it is Pilot, Co-Pilot, Passenger Left, Passenger Right, Cargo. | |
| Additional Aircraft | You can add more aircrafts to your project. BushTripInjector will create the mission for each aircraft without duplicate the images and sound files to reduce the mission sizes on PC and XBOX. Currently, it is not possible in MSFS to change the activity widget and reward screen per aircraft. Aircraft: self-explanatory Title: A unique Title. If empty, BTI uses base title appended by aircraft name Payload: The payload for this aircraft Fuel %: The fuel of the aircraft. If 0, fuel of the base is used. | |
| Load Flight Plan in GPS | If you tick this field the Flight Plan will be loaded in the GPS engine | |
| Cold & Dark | If ticked all systems are down. If not ticket the plane is started and all systems available. | |
| Parking Brake Set | Here you can specify whether the parking brake is set at all departure airports. Ticked: Parking Brake is set at all departures Unticked: Parking Brake handled by MSFS, but can be overwritten in Flightplan | |
| Fuel percent: | Move the slider from 0 to 100 | |
| autom. Refuel | With SU10, the aircrafts are refueled on each start of a leg, independent if the airport is offering fuel or not. When disabled, the feature of automatic refuel by MSFS is disabled. | |
| man. Refuel | If ticked the fuel menu is available on airports close to your route, if those airports offering any fuel. BushTripInjector is searching for those airports for you! If not ticked there is default bush trip behavior with currently no fuel menu available | |
| Range | Select the Range for the refueling airports. Available values are: – Trip: Rectangle around Departure and Arrival Airport + 10nm – Leg: Same as Trip, but for each leg. – Waypoint: Same as Trip, but for each Subleg. – Flightpath: Only Airports around 10NM to each side of the flightpath. – Flightplan: Only Airports in Flightplan. | |
| Refuel Airports | Shows a table of all airports offering fuel depending on selected range. | |
| Tail#/Call Sign/Flight# | In the fields you can give your input. | |
| Append Heavy | choose when appropriate | |
| Pilot/Copilot | Select the Pilot and Copilot shown in your aircraft. Choose between people of different origins and gender, casual and uniform! |
Departure
The Departure group is only visible for the mission type „BushTrip“.

| Starting Runway/Lat/Lon | Here you can select a departure runway or parking spot for the first airport. BTI will fill the coordinates, altitude and heading for you. If you have selected these parameters in LNM then they are filled in. You can make corrections if your plane falls or gets stuck on the runway when the first leg starts. Otherwise leave the fields unchanged. Remove the runway if want ATC to select a runway. |
| Starting Runway Altitude | This is the altitude of the starting runway. |
| Starting Pos Heading | The heading of the airplane on the runway. |
| Pitch/Bank | The pitch and the bank on the starting runway of your airplane. |
LandingChallenge

| Type | One of Epic, Famous, StrongWind |
| LeaderBoard | Not Set: True for MS/Asobo, False for all others Ticked / True: A leaderboard is added Unticked / False: No leaderboard available Please note that the leaderboards are managed by the simulator and are currently only used for official landing challenges. |
| Aircraft Category | One of Bush, Private, AirlinerThis option has effect to the score, the maximum radius of the area around the airport and some more parameters. Max. radius is 8 NM for Bush, 10 NM for Private and 15 NM for Airliner by default. |
| Lat/Lon | The spawning position of your aircraft. Taken from the first waypoint of the Little Navmap-File. |
| Speed | The velocity of your aircraft on spawn position in ft/sec. |
| Altitude | The altitude of your aircraft on spawn position in feet above MSL. |
| Check spawn AGL | If ticked, BTI will check the spawn altitude, if it is at least „Minimum Alt. above Ground“ at spawn position |
| Minimum Alt above Ground | Used when „Check spawn AGL“ is ticked |
| Pitch/Bank/Heading | The Heading, Pitch and Bank of your aircraft |
| Arrival Runway | The runway, where your LandingChallenge is designed for. |
| Distance | You can control the radius around the airport defined by the Aircraft Category. Default: Standard behavior, as described aboveCalculate: BTI calculates the radius and displays it next to it. However, it will never be smaller than the default values.User: You can specify a value yourself. This is also only used if it is greater than the default values. |
Flight

| Adjust Altitude | Gives the possibility to flight plan altitude for airports (Ground level) and waypoints (n ft above AGL). |
| Round Up! | If this is checked: For waypoints, the altitude (AGL + value) is rounded up to the nearest 1000 feet. If this value is above 3000 feet AGL, the default global half circle rule is used: Flights to the east fly at odd altitudes, those to the west fly at even altitudes. Since these are VFR flights, 500 feet are added. |
| Multiplayer | Tick this box, if you want to enable multiplayer bush trip . |
| Cruising Altitude | Adjust your cruising altitude of your bush trip. The cruising altitude is used for auto pilot, flight plan and some calculations inside BushTripInjector and MSFS. |
| Flight State | Visible for Landing Challenges, only. Here you can select, in which flight state your landing challenge starts. Default value is a calculation of BTI, depending on your flightplan. You can change it every time you want. |
| Open FLT | Visible for Landing Challenges, only. Clicking on this will open the selected flight state FLT file of the aircraft. Holding „Ctrl“ when clicking the button will open the path of the file in windows explorer. |
Landing

| Landing Options | Here you can set the conditions which have to be met to close the leg. If ticked the condition has to be met if not ticked the condition is ignored. Parking Brake set Battery Master Off Avionics Master Off Engines Off |
Weather/Season

| Weather | Choose the weather for your trip. Pre-set: Weather settings predefined by the Sim Live: Live weather, changeable in the created bush trip Custom: Your own weather file |
| Season/DateTime | The time and season of your bush trip for instance: Take the season from the roll down menu: Select the date from the calendar. Time format is: HH:MM:SS in separate fields. |
| Show 3D Thermal | Activates the visualisation of the thermals in the simulation. If you want to allow the user to change this option within the mission, you have to enable the menu option Weather. |
Menu Options

| Available Menus | Here you can choose which custom toolbar option is available in the bush trip . If not ticked the option cannot be selected. ATC Fly Assistant Checklist Navlog VFR Map Weather |
other Options

| Colors | Feel free to select the color of the lines and text on your images. |
| Type of images | Select the type of the images of your bush trip |
| Custom Reward screen | Untick this, if you don’t want to use a custom reward screen. Keep in mind that existing rewards screens will be moved to the paper bin in the next generation. If it is turned on, you can select an image in the Image Sheet, or use the image generated by BTI. |
| TTS Optimization | BushTripInjector can optimize the activation of your TTS defined by Flightplan and WorldMap. These TTS are then only active on the corresponding leg. With this you can control if this should be active for TTS from Flightplan and/or TTS from Worldmap. |
| Translation Options | In other languages then English, the voice output of MSFS TTS sounds very strange and fancy. With this option, you can deactivate the default translation of TTS and use a language of your choice. Of course, you have to have the translations inside of BTI. |