
Actions-Menu
Generate 2D images
When selected BushTripInjector creates 2D images from the World Map. These images are presented in the Tab Flight Plan of BushTripInjector.
They will displayed inside the sim as images for the landing area on last waypoint of each leg
Generate 3D Images
Generate semi-automatic 3D images for the briefing of your leg, you can fly from every waypoint or airport and Auto-Land your Aircraft on each destination.
Read the instructions in the top of the window to create our 3D Images for Waypoints, Landings or Briefings.
More Details for this window and description of additional features can you find here.
Convert/Resize Images
Convert Image-Filenames to Ascii-7 to avoid conflicts with compress/expand-tools not handling UTF-8 characters in filenames. Existing images will be converted by BushTripInjector.
It is now possible to specify which images should be converted, the size of the images can be selected and whether the aspect ratio should be maintained.
A detailed description of this functionality can be found here.
Cleanup Image Folder
Removes images which are not used.
Audio-Resampling
Resample your recordings or own file to Microsoft Flightsimulator supported formats. For details about this function see the Audio Resampling function.
Translate…
For your users you can translate the texts in your Bush Trip into different languages. Flight Simulator will read and display the appropriate language instead of American-English.
A detailed description can be found here!
Glossaries…
Define you own glossaries or use pre defined and maintained glossaries from the BushTripInjector Community for automated translations.
A detailed description can be found here!
Change Project Language…
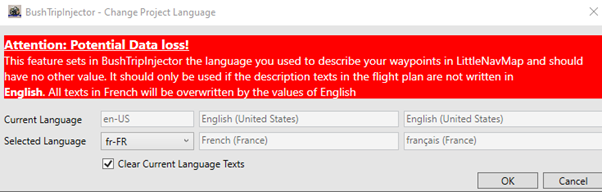
If you are creating a new bush trip, BTI sets the language to en-US. If your flight remarks and plight plan position remarks in a different language, it is strongly recommended to set the project language to the language used. You can change this every time, but you should do it before you start with translations.
Tick the „Clear Current Language Texts“ box, if you want to have a clear old language after the switch.
Create Flightbook…
Create Flightbook creates a documentation of your bush trip in OpenXml-Document format. This can be opened and modified by many word-processing-apps like MS Word, Google Docs, OpenOffice, Apache OpenOffice and many more. The document should be compatible with ISO/IEC 29500, but no warranty – I don’t like to read 6000+ pages of documentations.
You can use your own template to have a common format for all of your bush trips with your own logos.
Select between free text and a tabled format of the information provided on a waypoint.
Add a table of content with in-document links. Most word-processing-apps support a PDF-export including this links.
Of course, you can create the FlightBook for all languages supported by MSFS and you have made translations.
For details more details see Flight Book!
Load missing text from Wiki
In Little Navmap you can enter a describing/explanatory text in the comments of the way point. BTI reads this texts from your Flight Plan and enters the text in the column: Navlog Waypoint Comment. This Navlog Waypoint Comment is after generation and compiling of the Bush Trip displayed in the Navlog.
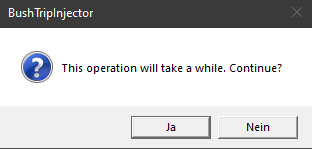
If you did not enter any comments in LNM then you have the possibility to retrieve appropriate test from Wiki. Click the button and you get the next warning:
When you select Yes then BTI will start a search for text in the Wiki. If found the text is displayed in the Flight Plan in the column: Wiki.
BTI has taken the first text available. If you do not like the text click on the Wiki button in the Actions column. You will see the found items with the way point. Untick the selected text and tick the text you like and want to display in the Navlog.
In the tab Flight Plan there will be more explanation.
Usage-Database
All airports, runways, parkings, navigation aids such as VOR, NDB, named waypoints and procedures like SID, STAR, transitions and all approaches (ILS, GPS, RNAV, LOC, …) your mission is using are stored in the usage database.
The entry in this database is made automatically when the mission is generated. With the help of this database, you can check whether changes in the simulator have negative effects on your missions.
Check…
This function checks the stored information in the usage database against the current database. If airports, runways or parkings, navigation aids or procedures are no longer available, this will be displayed after the check. Depending on the size of the usage database, this may take a few minutes.
Import…
The usage database function was introduced with BTI 2.4. Missions created with older versions are thus not included. To add these missions, there are two possibilities:
- Bundle all missions:
Create a bundle of type BTI and add all missions, Bushtrips, Landing Challenges, Discovery Flights, etc, to the bundle. Generate all missions from the bundle and they will be added to the usage database. You also have the advantage of checking whether all missions can still be generated and compiled. The disadvantage is that it takes up twice the space on your disk. - Import…
You can also import your missions with this function. Simply select all BTI files. The process may take a little longer depending on the number of BTI files and you may also see errors in the projects, but not as many as when importing via a bundle.
Rebuild
Sometimes there will be new functions to check usage. I.e. in a future update BTI can check airways, for example. To include these definitions in your database, you can recreate them with this. This will load all projects that are already in the database and re-read and apply all supported attributes.
Create Backup Zip…
This feature creates a full backup of your mission including all source packages, compiled packages, additional files, images, sound files and of course the BTI-File and the LNM-File.
Projects of type Bundle includes also all sub missions with their BTI- and LNM-files.
Publish Project…
This feature creates a package for your users. Create a package for publishing on the MSFS Marketplace or for uploading to a freeware platform. Adjust the version number based on your changes: Major, Minor, Patch. Your project will be rebuilt completely without debug output (if active, debug mode will be turned off for the build), compiled and then packed as a ZIP file. A detailed documentation can be found at Publishing a Project.
Manage your published packages in a folder of your choice, of course organized by version number. See also Options.
Compile Mission
This menu item is only available if you activated the Advanced Features in Options. It compiles the mission as it is in this state. No generation is executed and your last changes may no appear in your mission. No support for this function.
Generate Sub-Mission
For testing purposes of your trip, you can generate a part of your mission. Select in the submenu, which legs you want to include. Each Submission contains the selected leg, and if there is a following leg, the following leg.
Generate Mission
It is recommended to do this in full screen mode to improve the quality of the graphics.
BTI will check for any previously created bush trip project directories and ask for your permission to delete them. This is necessary to avoid side effects that occurred during the development and beta phases. This can be especially annoying with saved missions if you have already travelled a long way. Confirm the dialogs with caution.
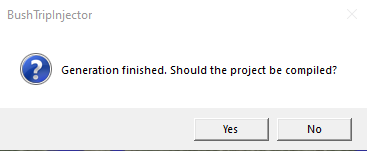
If you wish, your created bush trip will be compiled by the flight simulator.
One (without SDK) or two (with SDK) console windows will appear. Do not panic, they are necessary, please do not close these windows without being asked to do so.
The flight simulator is now started in a special mode, this process can take a few seconds/minutes.
In the flight simulator command window, some lines are displayed. If they all work, there should be no errors displayed.
PackageBuilder | Finished, 0 skipped, 4 done and 0 failed
Please check this. Here you will also be asked to close the window with the usual message „press any key….“. Activate the FS window with the mouse and press a key, both windows should close.
Afterwards BTI will ask you if you want to copy the created Bushtrip into the community folder and start the flight simulator for you to test the Bushtrip.
Important Steam Settings
Steam/FSPackager-Bug
Currently there is a problem in the interaction between Steam and MSFS. So, compiling did not work with some Steam versions. BushTripInjector can work around this in two ways:

- Compile directly via Steam. Select the path to Steam.exe, set the field close to the steam.exe to “-noverifyfiles -silent -applaunch 1250410” without the “” and choose „Use for compile“. Known issue: If Steam is set to Faststart, this will not work.
- Compile directly with the flight simulator. Select flightsimulator.exe and choose „Use for compile“. But in some versions steam disables and prevents the start. The same applies to the automated start of the simulator with steam.